Portfolio #5: Cliffside
(warning: next portfolio is really awesome)
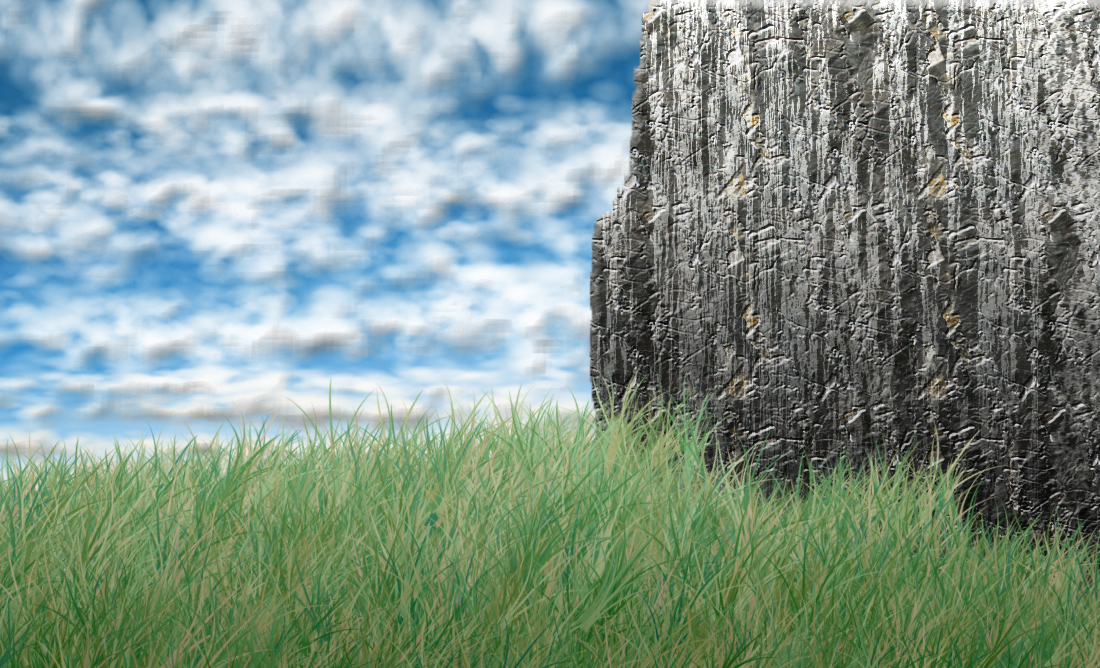
New image, 1100x668, 72 ppi.
Do Filter>Render>Fibers on a new layer. Variance=17, strength=4. Foreground is white, background is black. Double-click the layer, and then press OK on the window that comes up. Select part of the layer and use ctrl-T to contract it horizontally. Then select the other part of the layer and use ctrl-T to expand it horizontally to fill in the blank space left behind. Repeatedly do this until the left part of the laer is contracted horizontally and the right part of the layer is expanded horizontally. Next, apply Image>Adjustments>Curves
and make a curve that looks something like this:
__
/ \
/ \
/ |
/ \
/ \
/ \
/ \__
_/ ---- _______
Use the Quick Selection tool to select roughly the right half and left edge of the layer. Then erase the entire selected area. Then deselect and do the Curves again:
_____
_ __/ \_____
__/
_/
/
/
/
_/
_/
/
Move the whole layer to the right until the right edge is no longer visible. Erase a large portion of the bottom part of the layer (maybe 1/3 of the way up) with less erased on the right and more erased on the left. You can kind of see this below.
On the layer, add a Bevel and Emboss with default settings. Add a Texture with depth 50%. Add a Pattern Overlay with blend mode normal and opacity 30%. Add a Gradient Overlay from white to black with blend mode Overlay. It should look like a big rock face.
Make a new layer above the cliff layer. Set the foreground color to dark green and the background color to yellow.
Use the Grass Brush to fill in the whole bottom part of this layer, up to the bottom part of the cliff. On the grass layer, add a gradient overlay with default settings and an opacity of 30%.
Now we are ready to fill in the background.
First, add the sky, with a gradient from light blue to dark blue, using the Gradient tool. Put it below all the other layers.
Now create a brush. This a long process. I will list all the steps.
1. Select the normal circular brush.
2. Click on the icon which should be somewhere near the top right that looks like a jar of paintbrushes. If it's not there, press F5 or go to Window>Brushes. You should see a window pop up.
3. Click on the Shape Dynamics tab.
4. Change the Size Jitter to 50%.
5. Change the Angle Jitter to 100%.
6. Change the Roundness Jitter to 50%.
7. Change the Minimum Roundness to 25%.
8. Click on Brush Tip Shape.
9. Change Hardness to 10%.
10. Change Spacing to 100%.
11. Change Diameter to 60 px.
12. Click on the Scattering tab.
13. Change Scattering to 150%.
14. Change Count to 10.
15. Change Count Jitter to 100%.
16. Click on the Texture tab.
17. Choose the texture called Clouds..
18. Check the box that says Texture Each Tip.
19. Change the Mode to Color Burn.
20. Change the Depth to 50%.
21. Change the Minimum Depth to 100%.
22. Change the Depth Jitter to 100%.
23. Change the Scale to 150%.
24. Close the window.
You should have a brush now.
Don't change the brush you have.
Now make a new layer, between the sky and the foreground, and make some clouds with it. Set the foreground color to white.
You might want to change the Flow.
Make clouds on as many layers as you want, using Free Transform as needed. Try to compress the clouds vertically near the bottom to account for perspective. Once you're done, merge all the layers with clouds on them using Merge Down. Add a Gradient Overlay, from white on top to whitish-orange on the bottom. Also add a Bevel and Emboss with a very small depth, about 50%.